CHAT TO ME
MY TERMS
All of my ideas are copyrighted to me as they are my original designs. Any resemblence to any other tutorial is purely coincidental.
Do Not Translate, copy, email, download (ie; save to your own hard drive) distribute and/or make scripts/ quick guides from my tutorials.
Do Not hot link to my images or files.
Do Not upload my files to any other site. Do not share my files with others, as some of the contents require permission from thier creators to be shared.
If you are a group manager & wish to use my tutorials in your challenges, you must email me for permission BEFORE you link to my site. I reserve the right to join any group that links to my site.
VISITORS
Labels
- Awards (12)
- CT TUTORIALS (312)
- CUSTOM SERVICES (148)
- Freebies (64)
- MY TUTORIALS (299)
- PTU CU (12)
- ScrapKits (152)
- TAGS (9)
Blog Archive
- 2012 (60)
-
2011
(308)
- December(19)
- November(18)
- October(9)
- September(24)
- August(11)
- July(11)
- June(23)
- May(36)
- April(35)
- March(28)
-
February(41)
- Sparkalicious
- I'll be your Lucky Charm
- It's All About Me
- Kiss Me I'm Irish
- Death Do Us Part
- Sarahlicious
- Braylin Collab by Angel's Designz & Foxys Designz
- Check this out, My Entire Wicked In Collection ca...
- Misty created this sexy tag/tut using my Wicked I...
- NEW KIT~My Little Ladybug
- Chatita created this cute tag/tut using my LadyBug...
- Shattered Heart
- Grunge Girl
- Omneya created this stunning tag/stat using my ne...
- Sarah created this beautiful tag using my newest ...
- NEW BLINKIES_2-13-2011
- PTU KIT + A FREEBIE!
- NEW BLINKIES
- Omneya created this awesome forum set for me using...
- So Sweet
- NEW BLINKIES_2-8-2011
- NEW BLINKIES 2-6-2011
- NEW BLINKIE 2-6-2011
- Sandee created this tag/tut using my Wicked In Re...
- Omneya created this Dark Wicked tag/stat using my ...
- Kristi created this sexy forum set for me using m...
- Kristi created this so cute emo tag using my Sara...
- Gwen created this Awesome tag/tut using my Wicked...
- Gwen created this gorgeous tag/avatar for me using...
- Tara created another fabulous tag using my Birthd...
- Tara created this Hot,Sexy tag using my Dark Insp...
- Tara created this gorgeous tag using my wicked in...
- Sweet Love
- Sarah created this beautiful set using my Sweet Lo...
- Sarah created this sexy emo tag using my Sarahlic...
- Make Love
- Sarah created this cute Emo tag using my Sarahlic...
- Sarah created the top photo siggy using my ladybug...
- Playful
- NEW KIT_Ladybug Love
- Gothic Inspirations ♥Will Work For Scraps♥ CU Blog...
- January(53)
- 2010 (375)
- 2009 (333)
- 2008 (13)
Sparkalicious
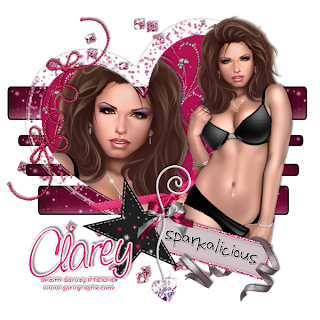 All of my tutorials require a working knowledge of PSP! This tutorial was written by me on February 22,2011. It is of my own ideas and creation! Any other tutorials found to be similar is coincidental.
Supplies Needed
Scrapkit of Choice
I'm using a Wonderful kit called Sparkalicious made by Clarey Designz. This is a PTU kit that is cannot supply. You can grab this awesome kit here
Tube of Choice
I'm using the Wonderful work of Keith Garvey. You must have a license to use his work! You can purchase that here
Let's Begin
Copy and paste HeartWrapped Frame3,Resize 65%.
Image,Rotate,Free Rotate,15.00,Left.
Take your magic wand and click inside the heart,pay attention around the wrap.
Selections,Modify,Expand by 2.
Selections,Invert.
Copy and paste paper17 and hit delete on your keyboard.
Selections,Select none.
Move paper below the frame layer.
Copy and paste Close up tube of choice,Resize 75%.
Place to your liking in the frame.
Take your magic wand and click inside the heart,pay attention around the wrap.
Selections,Modify,Expand by 2.
Selections,Invert.
Highlight the closeup tube and hit delete on your keyboard.
Selections,Select,None.
Add dropshadow to the tube.
Copy and paste diamondswirl,Resize 45%.
Place to your liking in the frame,(See mine for reference).
Merge the frame,paper,closeup tube,diamondswirl together.
Copy and paste clusterglitter,Resize around 45%.
Move behind the frame layer,add a light dropshadow.
Copy and paste another tube of choice,Resize 85%.
Place on the right side of the frame,add dropshadow.
Open paper11 in your psp.
Click on your background color,then pattern tab.
Find paper11 in the pattern section and hit ok.
Make your foreground color black.
Find your rectangle preset shape.
Change Horizontal Radius to 4.00 and Vertical Radius to 8.00.
Draw out a few rectangles,See mine for reference.
Move the rectangles below the frame layer but above the clusteredglitter.
Copy and paste String1,Resize 45%,See mine for placment and add a dropshadow.
Copy and paste Wordlabel1,Resize 35 to 45%.
Image,Rotate,Free Rotate,13.00,Right.
Adjust,Sharpness,Sharpen.
Place at the bottom of your tube layer and add a dropshadow.
Copy and paste StitchedStar,Resize to your liking,Place on the corner of the wordlabel.
Duplicate,Move the original below the label.
Take your eraser tool and on the copy of the star,remove the part that is hanging over the frame at the top of the label,See mine for reference.
Copy and paste dangle2,Resize 45%,See mine for placement,Add light dropshadow.
Copy and paste bow2,Resize 35%,Place on the dangle2,Add dropshadow.
Copy and paste curledribbon,place on the right side of the label.
Duplicate,Move the original under the label.
Take your eraser tool again and remove the parts hanging over the label on the copy of the curledribbon.
Add dropshdaow of choice.
Now add your name and copyright info!
Save as apng and your done.
Labels:
MY TUTORIALS
|
0
comments
It's All About Me
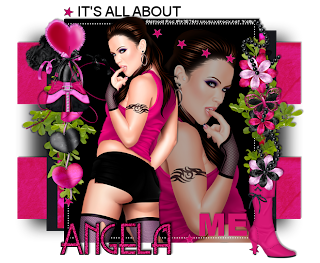 All of my tutorials require a working knowledge of PSP! This tutorial was written by me on February 22,2011. It is of my own ideas and creation! Any other tutorials found to be similar is coincidental.
Supplies Needed
Scrapkit of Choice
I'm using a Wonderful kit called Seduction In Pink made by Bastelgalaxy. This is a PTU kit that is cannot supply. You can grab this awesome kit here
Tube of Choice
I'm using the Wonderful work of Ismael Rac. You must have a license to use his work! You can purchase that here
Template17 made my Sylvie Creationz. You can grab the template here
Let's Begin
Open Template 17 in your psp
.Open paper11 in your psp.
Double Click on your background color,then click on the pattern tab.
Find paper11,then hit ok.
Make your foreground color null.
Highlight black rectangle 1,2.
Click inside each reactangle using your magic wand tool.
Flood Fill with paper11 on both rectangles.
Selection,Select none.
Now Click on the white rectangle to highlight that layer.
Take your magic wand tool and click inside.
Open paper5 in your psp and located it in your patterns same as above.
Flood fill this layer with paper5.
Selections,Select none.
Do the same as above on the pink rectangle layer,but this time find paper3 and fill with that.
Selections,Select none.
Copy and paste Close up tube of choice,Resize 80%.
See mine for placement.
Double click on the closeup tube layer.
Change the Blend Mode to Screen and the Opacity to 70%.
Highlight the stars on the template.
Selections,float,Defloat.
Flood fill with color from your tube.
Selections,Select none.
Copy and paste Tube of choice,See mine for placement.
Add dropshadow.
Change the color on the ME wordart to a color from your tube and then add a dropshadow.
Copy and paste Leave01,Resize 80% or to your liking.
Place on the right side of the template like mine.
Add dropshadow.
Duplicate this layer.
Image,Mirror,Image,Flip.
Copy and paste Shoe2,Resize 45% or to your liking.
Place on the right like mine,Add dropshadow.
Copy and paste deco3,Resize to your liking,add dropshadow and place on top on the leave01 on the right.
Copy and paste pendant03,Resize to your liking.
Place on the left side of the template like mine,add a dropshadow.
Copy and paste heart09,Resize to your liking.
Image,Mirror,Move into place like mine,Add dropshadow.
Copy and paste bad,Resize 45% or smaller if you like,Add dropshadow.
See mine for placement.
Copy and paste butterfly09,Resize around 30%.
Image,Rotate,Free Rotate,15.00,Left.Adjust,Sharpness,Sharpen.
Add a light dropshadow and place on the right side of your template like mine.
Now Add Your Name and CopyRight Info!!
Save as a png and your all done.
Labels:
MY TUTORIALS
|
0
comments
Kiss Me I'm Irish
 All of my tutorials require a working knowledge of PSP! This tutorial was written by me on February 21,2011. It is of my own ideas and creation! Any other tutorials found to be similar is coincidental.
Supplies Needed
Scrapkit of ChoiceI'm using a Wonderful kit called An Irish Jig made by Gothic Inspirations. This is a PTU kit that is cannot supply. You can grab this awesome kit here
Tube of Choice
I'm using the Wonderful work of Elias Chatzoudis. You must have a license to use his work! You can purchase that here
Template made my Mythical Designs.I have been given permission to use this,Thanks Mythical! Xox.. You can grab the template on her blog here
Let's Begin
Open the Kiss Me I'm Irish Template.
Hide the lips and the bg layer.
Open paper5 in your psp.
Click on your background color,then your pattern tab and find the paper.
Hit ok.
Make your foreground color null.
Now click on the oval frame layer with your magic wand tool.
Selections,Modify,Expand by 2.
Flood fill this layer with paper5.
Selections,Select none.
Now find your closeup tube of choice.
Copy and paste on to the canvas.
Resize 80%.
Copy and paste Rainbow,Resize to your liking,Place in the frame like mine.
Once happy with placement,Click on the oval frame layer again with your magic wand tool.
Selections,Modify,Expand by 2.
Selections,Invert.
Now highlight your close up tube and hit delete on your keyboard.
Do the same thing for the rainbow.
Highlight your closeup tube,Double click on the layer.
Change the Blend Mode to screen.
Hit ok.Selections,Select none.
Copy and paste your 2nd tube of choice,Resize 85%.
Place like mine and add a dropshadow of choice.
Copy and paste Spiral,Resize around 75%,Move behind the template,Add dropshadow.
Copy and paste Clovers,Resize around 20%.
Image,Rotate,Free Rotate,13.00,Right,Add dropshadow.
Move to the right side of the frame.
Copy and paste GreenBeer,Resize 15%,Place below the clovers.
Add dropshadow.
Copy and paste Shoe,Resize 15 or 20%.
Place in front of the freenbeer like mine,add dropshadow.
Copy and paste Clover Charm,Resize around 15 or 20%.
Image,Rotate,Free Rotate,13.00,Left.
Add a light dropshadow and place like mine.
Copy and paste Tag,Resize 20%.
Place on the clovercharm,add light dropshadow.
Copy and paste Butterfly,Resize 15%.
Place on the close up tube hat and add a dropshadow.
Copy and paste Clover Shower,Resize to your liking.
Place like mine,You may have to use your eraser tool to remove some that cover your tubes.
Add a dropshadow.
Copy and paste paper10 below all layers.
Apply a mask of choice,make sure your merge group on the mask layer.
Now undhide the lips.
Resize to your liking,and place where you like.
(I placed one on the tag with some writing)
Add Your Name and Copyright Info now!
Save as a png and your done.
Labels:
MY TUTORIALS
|
0
comments
Death Do Us Part


All of my tutorials require a working knowledge of PSP! This tutorial was written by me on February 21,2011. It is of my own ideas and creation! Any other tutorials found to be similar is coincidental.
Supplies Needed
Scrapkit of Choice
I'm using a Wonderful kit called Till Death Do Us Part,made by Grunge & Glitter. This is a PTU kit that is cannot supply. You can grab this awesome kit here
Tube of Choice
I'm using the Wonderful work of Ismael Rac. You must have a license to use his work! You can purchase that here
Plugin-Mura Meisters_Copies
Let's Begin
Open new image 600x250.
Copy and paste Paper1.
Open paper4 in your psp.
Click on your Background color.
Then click on the pattern tab and find paper4 and hit ok.
Make your foreground color null.
Now Draw out a nice size rectangle.
Look at mine for reference to size.
Add dropshadow to the rectangle.
Move down to the bottom of the canvas.
Now copy and paste close up tube of choice.
Place to your liking behind the red paper.
Resize to your liking.
Double click on the closeup layer,and change the opacity to 70.
Copy and paste Doodle2,Resize to your liking.
Place on the red paper,add dropshadow and merge down onto the red paper.
Now open a black paper of choice.
Make this color your background color.
Make sure the foreground color is still null.
Draw out a thin rectangle,(See mine for reference).
Now pick a small font in white.
I'm using uni 05_53 font on size 7.
Type out Till Death Do Us Part on the black strip.
Now i used Mura Meisters Copies to do the line for the font.
Just make sure ur on the line preset and play with the settings.
Duplicate,Move the duplicate font down below the font you typed out on the black strip,see mine.
Merge the 2 fonts down onto the black strip.
Double click on the black strip and change the Opacity to 65% or 70%.
Now duplicate this black strip a few times and move into place.
Copy and paste Flowerbranch,Resize to your liking.
Take your Deform tool and rotate the flowers.
Place at the top right of the red paper.
Add dropshadow,Duplicate and move into place.
Now copy and paste Blood1,Resize 45% or smaller if you like.
Place at the top of the canvas,Duplicate,Image,Mirror.
Add light dropshadow to both.
Copy and paste tube of choice,Resize 75% or to your liking.
Place like mine or where you want,Add dropshadow.
Copy and paste Spider,Resize 30-35%.
Place to your liking,Add dropshadow.
Copy and paste Candle,Resize to your liking,Place like mine.
Add dropshadow of choice.
Copy and paste wineglasses,Resize around 15-20%.
Place by the candle,Add dropshadow.
Copy and paste weddingfavors,Resize to your liking,Add dropshadow.
Copy and paste zippedlips,Resize around 20-25%.
Image,Rotate,Free Rotate,13.00,Right.
Place in the bottom left corner,Add dropshadow.
Now Add Your name and Copyright info.
Merge all layers visible and save.
All done.
Labels:
MY TUTORIALS
|
0
comments
Sarahlicious
 Purple's Tutorials created this awesome emo/punk tag/tut using my Sarahlicious kit. Check out her blog for the tutorial HERE
Thanks hun,i love this!
Labels:
CT TUTORIALS
|
0
comments
Braylin Collab by Angel's Designz & Foxys Designz


 New Collab up exclusively @ DigiFoxsStudio. Me and one my besties have come together to bring u this beautiful kit. U can purchase the kits together or seperate. U Can find them HERE
Labels:
ScrapKits
|
0
comments

 Check this out, My Entire Wicked In Collection can now be purchased as a Bundle! Woot Woot,But all 6 kits in this bundle for $13.00 and save $6.00.
U can now also buy my Ladybug kits in bundle as well. Both kit's for $5.00.
Labels:
ScrapKits
|
0
comments
 Misty created this sexy tag/tut using my Wicked In Black Kit. U can find the tutorial for this tag on her blog HERE
Thanks hun,Love it!
Labels:
CT TUTORIALS
|
0
comments
Chatita created this cute tag/tut using my LadyBug Love kit. Check out her blog to find the tutorial to this tag HERE
Thanks hun,I Love It!!
Labels:
CT TUTORIALS
|
0
comments
Shattered Heart
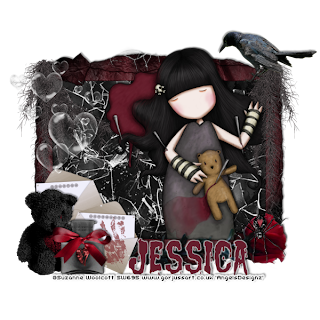
All of my tutorials require a working knowledge of PSP! This tutorial was written by me on February 14,2011. It is of my own ideas and creation! Any other tutorials found to be similar is coincidental.
Supplies Needed
Scrapkit of Choice
I'm using a Wonderful kit called Anguished made by Gothic Inspirations. This is a PTU kit that is cannot supply. You can grab this awesome kit here
Tube of Choice
I'm using the Wonderful work of Suzanne Woolcott. You must have a license to use her work! You can purchase that here
Let's Begin
Open new image 600x600.
Copy and paste Frame5,Resize around 60-65%.
Copy and paste Paper2,Resize 55%,Move below frame.
Click on the frame to highlight it.
Take your magic wand tool and click inside the frame.
Selections,Modify,Expand by 6.
Selections,Invert.
Highlight the paper layer and hit delete on your keyboard.
Selections,Select none.
Copy and paste BrokenGlass,Move below frame layer.
Resize 60%,add dropshadow of choice.
Copy and paste Moss,Resize to your liking.
Place on the left side of frame.
Duplicate,Image,Mirror and move into place,add dropshadow to both.
Copy and paste tube of choice,Resize around 85%.
Place in frame,add dropshadow.
Copy and paste Crow,Resize around 20-25%.
Image,Mirror.
Place to your liking and add a dropshadow.
Copy and paste Rose,Resize to your liking,and place along the bottom of the frame.
Add dropshadow of choice.
Copy and paste Spider,Resize 20%,Place on the rose,Add dropshadow.
Copy and paste Envelopes,Resize around 25-30%.
Place at the bottom left of your frame,Add dropshadow.
Copy and paste TeddyBear,Resize 20%,Place like mine,Add dropshadow.
Copy and paste Ashes,Resize 15%.
Place in front of the teddybear,Add dropshadow.
Copy and paste Bow1,Resize 15-20%.
Take your Deform tool and rotate it like mine.
Place on the ashes bottle,Add dropshadow of choice.
Copy and paste Bubbles,Resize to your liking.
Place on the left side on your frame above the envelopes,bear and ashes.
Add a light dropshadow of choice.
Now add your name and copyright info!!
All done.
Labels:
MY TUTORIALS
|
1 comments
Grunge Girl
 Tiffany aka Sweet southern Comfort created this awesome tag/tut using my Wicked In Purple kit. U can find the tutorial to this tag and more on her blog HERE
Labels:
CT TUTORIALS
|
0
comments
 Omneya created this stunning tag/stat using my newest kit Riley Renee. Visit her blog to find more amazing creations HERE
Labels:
CT TUTORIALS
|
0
comments
 Sarah created this beautiful tag using my newest kit Riley Renee. Check out her blog for more amazing creations HERE
Labels:
CT TUTORIALS
|
0
comments
PTU KIT + A FREEBIE!
 This kit was made for a friend who lost their lil one at such a young age and for many more who also have lost a child.. It was definitly a pleasure making this kit. I will be uploading this kit into stores tonight! 50 Elements and 12 papers, cherish your memories of your lil one using this kit!
 Freebie time! This is a smaller version of the kit above,different elements in both kits. I have not seen a kit made for this awareness yet. This kit has 23 Elements and 12 Papers. U can grab this FTU kit Here
Enjoy~♥Kelly
Labels:
Freebies,
ScrapKits
|
2
comments
Labels:
CT TUTORIALS
|
0
comments
So Sweet
 Julie created this stunning tag using my Sweet Love kit. U can find the tutorial for this tag HERE
Tysm Julie,It's beautiful! Xox
Labels:
CT TUTORIALS
|
0
comments
 Sandee created this tag/tut using my Wicked In Red kit.
Sandee created this awesome tag using my Love Sucks kit.

Sandee created another Awesome tag/tut using my L.I.E aka Love is Evil kit. Check out her blog to find all 3 tutorials for this amamzing tags HERE
Awesome!,Tysm hun,Love em! Xox
Labels:
CT TUTORIALS
|
0
comments

Omneya created this Dark Wicked tag/stat using my Misfortunate Girl Kit. Check out her blog for more amazing stats HERE
Love it! Perfect tube :) Xox
Labels:
CT TUTORIALS
|
0
comments

 Kristi created this sexy forum set for me using my Wicked In Red Kit.
 Kristi also created this awesome tag using my part of The Bitch Squad kit. Check out her blog for more awesome creations HERE
Thanks hun,Love them all!! Xox
Labels:
CT TUTORIALS
|
0
comments
 Kristi created this so cute emo tag using my Sarahlicious kit. Check out her blog to find more awesome creations HERE
Thanks hun,Love it! Xox
Labels:
CT TUTORIALS
|
0
comments
 Gwen created this Awesome tag/tut using my Wicked in Green kit. Check out her blog to find the tutorial HERE
Thanks hun,Love it! Xox
Labels:
CT TUTORIALS
|
0
comments
Gwen created this gorgeous tag/avatar for me using my Wicked in Black kit. Check out her blgo for more awesome creations HERE
Love them both,Tysm!! Xox
Labels:
CT TUTORIALS
|
0
comments
 Tara created another fabulous tag using my Birthday Bash kit! Check out her site for more awesome tags HERE
Thanks for all of them hun,Love em!! Xox
Labels:
CT TUTORIALS
|
0
comments
Subscribe to:
Posts (Atom)
Blog Archive
-
▼
2011
(308)
-
▼
February
(41)
- Sparkalicious
- I'll be your Lucky Charm
- It's All About Me
- Kiss Me I'm Irish
- Death Do Us Part
- Sarahlicious
- Braylin Collab by Angel's Designz & Foxys Designz
- Check this out, My Entire Wicked In Collection ca...
- Misty created this sexy tag/tut using my Wicked I...
- NEW KIT~My Little Ladybug
- Chatita created this cute tag/tut using my LadyBug...
- Shattered Heart
- Grunge Girl
- Omneya created this stunning tag/stat using my ne...
- Sarah created this beautiful tag using my newest ...
- NEW BLINKIES_2-13-2011
- PTU KIT + A FREEBIE!
- NEW BLINKIES
- Omneya created this awesome forum set for me using...
- So Sweet
- NEW BLINKIES_2-8-2011
- NEW BLINKIES 2-6-2011
- NEW BLINKIE 2-6-2011
- Sandee created this tag/tut using my Wicked In Re...
- Omneya created this Dark Wicked tag/stat using my ...
- Kristi created this sexy forum set for me using m...
- Kristi created this so cute emo tag using my Sara...
- Gwen created this Awesome tag/tut using my Wicked...
- Gwen created this gorgeous tag/avatar for me using...
- Tara created another fabulous tag using my Birthd...
- Tara created this Hot,Sexy tag using my Dark Insp...
- Tara created this gorgeous tag using my wicked in...
- Sweet Love
- Sarah created this beautiful set using my Sweet Lo...
- Sarah created this sexy emo tag using my Sarahlic...
- Make Love
- Sarah created this cute Emo tag using my Sarahlic...
- Sarah created the top photo siggy using my ladybug...
- Playful
- NEW KIT_Ladybug Love
- Gothic Inspirations ♥Will Work For Scraps♥ CU Blog...
-
▼
February
(41)
