


Proposal
 All of my tutorials require a working knowledge of PSP! This tutorial was written by me on December 30,2009. It is of my own ideas and creation! Any other tutorials found to be similar is coincidental.
Supplies Needed
Scrapkit of Choice
I'm using a Wonderful kit called Something Borrowed Something New,made by Gothic Inspirations. This is a PTU kit i cannot supply. You can purchase her kit here
Tube of Choice
I'm using the Wonderful work of Jose A Cano. You must have a license to use his work! You can purchase that here
Template189 by Missy @ Divine Intentionz..Thanks hun!. U can get this template HERE
Let's Begin
Open new image 600x600,Flood fill white
On the template layer highlight the rectangle,Copy
Paste onto the white canvas
Find paper 13,Open in psp,Click on your foreground color
Click on the pattern tab,find paper13,Hit ok
Take your Magic wand tool,Click on the rectangle
Selections,Modify,Expand by 1
Flood fill with paper13,Selections,Select none
Duplicate this layer,Take your Deform tool and rotate a little,See mine for reference
Duplicate again,Image,Mirror,Move into place
Find paper 3,Click on your foreground color,Click on pattern tab and find paper3
Highlight the middle rectangle,Take your magic wand tool and click on the middle rectangle
Selections,Modify,Expand by 1
Flood fill with paper3,Selections,Select none
Now add a dropshadow of choice to all 3 rectangles
Back to the template,Find the brackets layer,Copy
Paste onto white canvas,Take your Deform Tool again and rotate them a little
Find paper 10,Click on your foreground color again and then the pattern tab,Find paper10
Take your magic wand tool,Click on both brackets
Selections,Modify,Expand by 1,Flood fill with paper10
Selections,Select none,Add dropshadow to both
Copy and paste Tube of Choice,Resize to your liking,See mine for placement
Add dropshadow
Now get a closeup tube,Place on the top rectangle
Take your magic wand tool click on the top rectangle
Selections,Invert
Once happy with placement of the closeup tube,Hit delete on your keyboard
Selections,Select none
Change the Opacity on your closeup tube to 60 or 70 %
Copy and paste BeadSeads2,Resize to your liking and place along the bottom of your tube
Add light dropshadow
Copy and paste Chain,Resize to your liking,Place on top of the BeadSeads,Add dropshadow
Copy and paste Butterfly2,Resize 35%,Take your deform tool and rotate to the left
Add light dropshadow,See mine for placement
Copy and paste Butterfly,Resize 25 to 30%,Take your deform tool and rotate to the right
Copy and paste Rings2,Resize to your liking,Place on bottom right side of brackets
Add dropshadow of choice
Copy and paste CharmHeart,Resize 20-25%,See mine for placement,Add light dropshadow
Copy and paste Ribbon,Resize 25%,Place on top of the CharmHeart,Add light dropshadow
Back to template,Copy the stars layer
Paste onto white canvas,Image,Mirror,Resize to your liking
Take your magic wand tool and click on each star,Flood fill with a light pink color from Ribbon
Selections,Select none,Add dropshadow of choice
Copy and paste paper6 below all layers but above white background
Apply mask of choice,Merge group on mask layer
Add Your Name and CopyRight Info!!
Copy and paste Heart2,Resize 20%..Maybe 15%Image,Mirror,Place by your name and add a dropshadow
That's it,All done :)
Blood Moon
 All of my tutorials require a working knowledge of PSP! This tutorial was written by me on December 30,2009. It is of my own ideas and creation! Any other tutorials found to be similar is coincidental.
Supplies Needed
Scrapkit of Choice
I'm using a Wonderful kit called Blood Moon Volturi,made by Gothic Inspirations. This is a PTU kit i cannot supply. You can purchase her kit here
Tube of Choice
I'm using the Wonderful work of Ted Hammond. You must have a license to use his work! You can purchase that here
I'm using the Wonderful work of Ted Hammond. You must have a license to use his work! You can purchase that here
Let's Begin
Open new image 600x600,Flood fill white
Copy and paste GlitterSpill,Resize 60%
Copy and paste Mist,Resize 60%,Change the Opacity to 60%
Place in front of your tube
Take your Eraser tool and remove the fine square line around the mist
Copy and paste tube of choice,Resize 75%,Add dropshadow,See mine for placement
Copy and paste MistWMoon,Resize 50%,Place behind your tube layer
Use your Eraser tool again on the straight lines of the mist
Copy and paste Leaves,Resize 60%,See mine for placement,Add dropshadow
Copy and paste MusicNotes,Resize 50%,See mine for placement,Add dropshadow
Copy and paste Neclase,Resize 30%,Place on the musicnote
Take your Eraser tool and remove a small part of the neclase so it looks like it's hanging
Add light dropshadow of choice
Copy and paste paper30,Resize 65%,Apply Mask of Choice
Merge group on mask layer
Copy and paste Candle2,Resize 35%,See mine for placement,Add dropshadow
Copy and paste Bottle,Resize 15%,Place by the candle,Add dropshadow
Copy and paste ClusterElement,Resize 25%,Place in front of the bottle and candle,Add dropshadow
Copy and paste Crow2,Resize 15%,Place in front of the moon,Add dropshadow
Change the Opacity on the crow to 70%
Copy and paste Tree,Resize 65%,Place behind the moon
Copy and paste Splatter3,Resize 25%,Place behind the candle,bottle and clusterelement
Copy and paste Wordart2,Resize 20%,Place on the moon under the crow,Add dropshadow
Copy and paste RedFeather,Resize 20%,Place on the left corner at the bottom of your tube or tag
Duplicate,Image,Mirror
Now Add Your Name and CopyRight Info!!
All done:)
Newest Blinkies 12/30/09

This Blinkie was made for Mystee over @ InToXxiKaTed InTenTionz


This Blinkie/Banner Combo was made for a good friend of mine Chantal aka ChaDesignz
Blog Award!

Many thanks to Betty at "Betty Freak's Style"for nominating me for this Award!
Be sure to check out her blog...she has some great scrap kits.
The rules are very simple:
Put the name and link of who gave you this award on your blog.Then pass it on to 5 blogs which you think are AWESOME.
1. Jessica @ Gothic Inspirations
2. Natasha @ Sticky Kisses Designs
3. Cari @ Black Widow Creationz
4. Cazie @ Cazie's Psp Designs
5. Tiffany @ Sweet Southern Comfort Creations
Newest Kit~My Addiction~12/21/09

My newest kit..I just finished it! I'm so addicted to goth i just can't help but keep creating them lol. I'm sure many others out there like myself love goth!! This kit isn't in stores just yet,but i'm working on it. U can find my kit in some stores starting tonight!! Hope u all love this kit as much as i enjoyed making it. There is 4 bonus wordart included in the kit.
Enjoy!~♥Kelly
Sexified

All of my tutorials require a working knowledge of PSP! This tutorial was written by me on December 21,2009. It is of my own ideas and creation! Any other tutorials found to be similar is coincidental.
Supplies Needed
Scrapkit of Choice
I'm using a Wonderful kit called Glamour Girl,made by Rags. This is a PTU kit i cannot supply. You can purchase her kit here
Tube of Choice
I'm using the Wonderful work of Keith Garvey. You must have a license to use his work! You can purchase that here
Template267 made by Missy over at Divine Intentionz,Thanks hun! You can find HERE
Let's Begin
First thing we are going to do is open the template in psp
Hold down Shift+D
Delete the original copy
On the template layer,Delete the 1st and bottom layer
Click on the Bitch layer,Take your magic wand tool and click on it,make sure you click on the dot in the i and the dot on the exlamation point
Now Find paper18,Open it in psp
Click on your foreground color,Click on the pattern tab
Find paper18,Click ok
Selections,Modify,Expand by 1
Flood fill the Bitch layer with paper18
Selections,Select none
Click on the Pink Rectangle layer,Take your magic wand and click on the inside of the pink rectangle
Flood fill with paper18 again
Find a closeup tube of choice,Place under the frame,Once happy with placement
Take your Magic Wand tool,Click inside the frame
Selections,Modify,Expand by 2,Selections,Invert
Click on closeup tube,Hit delete on your keyboard
Selections,Select none
Now copy and paste tube of choice,See mine for placement,Add dropshadow
Click on Oval layer with your magic wand tool
Find paper 19,Change your background color to paper19
Flood fill the Oval layer with paper 19
Highlight the Sexified layer,Click on each layer with your magic wand tool
Flood fill each layer with paper18,Selections,Select none
Highlight dotted line 1 layer
Adjust,Hue/Saturation,Colorize with these settings
Hue: 133
Saturation: 134
Hit ok
Do the same thing for dotted line 2
Now highlight words1,Go to Adjust,Hue/Saturation,Colorize with these settings
Hue: 215
Saturation: 128
Do the same thing for words2
Copy and paste Ribbon3,Resize 60%,See mine for placement,Add dropshadow
Copy and paste Blue Bling Lipstick,Resize 40%
Place on the right corner of the frame,Add dropshadow
Copy and paste Pink Bling Lipstick,Resize 30%,Place on the Blue bling lipstick,Add dropshadow
Copy and paste the 2 name tags: Babe,Sexy
Resize 60%,See mine for placement,Rotate the Sexy one using your deform tool
Now Add Your Name and CopyRight Info!
All Done!
Newest Blinkies 12/17/09


These 2 Blinkies were made for Dawn over @ Sugar kissed Scraps. She is such a sweet person and someone i call friend. U can check out her blog HERE
So Hot

All of my tutorials require a working knowledge of PSP! This tutorial was written by me on December 16,2009. It is of my own ideas and creation! Any other tutorials found to be similar is coincidental.
Supplies Needed
Scrapkit of Choice
I'm using a Wonderful kit called Purty in Pink,made by Addicted 2 Scraps. This is a PTU kit i cannot supply. You can purchase her kit here
Tube of Choice
I'm using the Wonderful work of Ismael Rac. You must have a license to use his work! You can purchase that here
Template109 made by Kristin,Thanks hun! You can find HERE
Let's Begin
Open new image 600x600,Flood fill white
First thing we are going to do is open the template in psp
Hold down Shift+D
Delete the original copy
On the template layer,Delete the 1st and bottom layer
Click on the Pink Rectangle
Open paper26 in your psp,Click on your foreground color
When the box opens,Click on the pattern tab,Find paper26 and hit ok
Take your magic wand tool and click on the pink rectangle box
You should now have marching ants,Take your flood fill tool and fill that box
Selections,Select none
Now click on Words2 layer,Go to Adjust,Add/Remove Noise,Add Noise
Use these settings
Uniform Checked
Monochrome checked
65%
Hit ok
Do the same as above on the Swirls layer
Now CopyMerge the template and paste onto the white 600x600 canvas
Copy and paste tube of choice,Place like mine,Add dropshadow of choice
Copy and paste element 72,Resize 40%,Place at the bottom of your tube like mine
Add dropshadow of choice
Copy and paste element 42,Resize 20%,See mine for placement,Add dropshadow
Copy and paste element 41,Resize 25%,Place on top of element 42,Add dropshadow
Copy and paste element 19,Resize 40%,Place behind the template layer at the top left
Add dropshadow
Duplicate,Image,Mirror,Move this one down to the bottom right
Copy and paste element 43,Resize 25%,Place like mine and add a dropshadow
Copy and paste element 35,Resize 25%,Place on the bow at the bottom,Add light dropshadow Copy and paste element 49,Resize 15%,Image,Flip,Paste on the element 35
Now Add Your Name and CopyRight Info!!
All done.
Scrappin Bratz Sale

December 12 - December 24
Scrappin Bratz will celebrate 12 days of Christmas Savings
A different sale
Everyday.
http://www.scrappinbratz.com/shoppe
Summer Surprise

All of my tutorials require a working knowledge of PSP! This tutorial was written by me on December 4,2009. It is of my own ideas and creation! Any other tutorials found to be similar is coincidental.
Supplies Needed
Scrapkit of Choice
I'm using a Wonderful kit called Summer Vacation,made by Gothic Inspirations. This is a PTU kit i cannot supply. You can purchase her kit here
Tube of Choice
I'm using the Wonderful work of Keith Garvey. You must have a license to use his work! You can purchase that here
Template109 You can find HERE
Let's Begin
Open new image 600x600,Flood fill white
First thing we are going to do is open the template in psp
Hold down Shift+D
Delete the original copy
On the template layer,Delete the 1st layer at the top
Pick your papers of choice. Click on the foreground color.Click on the pattern tab,find your paper.
Take your magic wand and click on the circle,Flood fill with your paper
Do the same for the rectangles and bracket,but use different papers of choice or the same as me
CopyMerge template over to the 600x600 canvas you made at the beginning
Copy and paste water doodle,Resize 35%,Place along the top rectangle
Copy and paste tube of choice,Resize 75%,Place near the circle
Highlight circle layer,Take your magic wand and click on it,Selections,Invert
Highlight tube layer and hit delete on your keyboard
Selections,Select none
Copy and paste Surfboard2,Resize 50%,Take your deform tool to tilt the board
Place behind tube like mine and add a dropshadow
Copy and paste sun,Resize 30-35%,See mine for placement,Add dropshadow
Copy and paste glitterbling,Resize to your liking,Place behind all layers
Copy and paste wordart2,Resize 35%,Place at the bottom of tube,Add dropshadow
Copy and paste umbrella,Resize 25%,Place on the wordart.
Use your deform tool to tilt it
Add dropshadow
Copy and paste bee,Resize 25%,See mine for placement,Add dropshadow
Copy and paste flower3,Resize 25%,Place in front of tube,(See mine for reference)
Add dropshadow
Take your selection tool and cut off bottom of flower
Now Add Your Name and Copyright Info!!
All done.
Certified Stalker
 All of my tutorials require a working knowledge of PSP! This tutorial was written by me on December 4,2009. It is of my own ideas and creation! Any other tutorials found to be similar is coincidental.
Supplies Needed
Scrapkit of Choice
I'm using a Wonderful kit called ORD made by Creationzbyjo. This is a PTU kit i cannot supply. You can purchase her kit here
Tube of Choice
I'm using the Wonderful work of Ismael Rac. You must have a license to use his work! You can purchase that here
Template255 You can find HERE
Let's Begin
Open new image 600x600,Flood fill white
First thing we are going to do is open the template in psp
Hold down Shift+D
Delete the original copy
Highlight Circle,Take your magic wand and click on it
Open paper14 in your psp,Click on your foreground color,Click on pattern Tab and find paper14. Hit ok
Flood fill the circle with paper14
Selections,Select non
eNow Highlight the Stalker layer
Take your magic wand and click in each letter individually
Copy and paste a different tube for each letter
Example below
(Starting with S,Click inside with your magic wand,Copy and paste 1st tube)
(Highlight the stalker layer again,Selections,Invert)
(Highlight tube layer and hit delete on your keyboard)
Selections,Select none
Do this for each letter
Now Copy and paste the circle over to the 600x600 canvas
Copy and paste your main tube of choice,Resize 70%,Place infront of the circle
Back to template,Hide the Circle layer,Copy merge al other layers
Paste onto the 600x600 canvas
On the stalker layer add a white dropshadow,make the opacity @ 100%
Do this a few times,add dropshadow
Copy and paste skull of choice,Resize 25%
Place between the S and T,Add dropshadow
Copy and paste BarbedCircle1,Resize to your liking,See mine for placement
Add light dropshadow
Copy and paste Clip,Resize 25%,Place on top of Circle
Copy and paste RacCharm,Resize 50%,See mine for placement
Copy and paste Tinyflower3,Resize 50%,Place on top of the raccharm,Add dropshadow
Copy and paste Stars,Resize 50%,See mine for place,Duplicate,Image,Mirror
Now add your name and CopyRight Info!!
All done.
East Side Diva

All of my tutorials require a working knowledge of PSP! This tutorial was written by me on December 4,2009. It is of my own ideas and creation! Any other tutorials found to be similar is coincidental.
Supplies Needed
Scrapkit of Choice
I'm using a Wonderful kit called East Side,made by Gothic Inspirations. This is a PTU kit i cannot supply. You can purchase her kit here
Tube of Choice
I'm using the Wonderful work of Keith Garvey. You must have a license to use his work! You can purchase that here
Template271 You can find HERE
Let's Begin
Open new image 600x600,Flood fill white
First thing we are going to do is open the template in psp
Hold down Shift+D
Delete the original copy
On the template layer,Delete the 1st layer at the top
Open paper2 in psp,Click on your foreground color,Under the pattern tab find paper2
Click on the circle half,Take your magic wand tool and click on it
Flood fill with paper2,Selections,Select none
Highlight small circle2 layer,Click inside with your magic wand
Flood fill with paper2,Selections,Select none
Highlight small circle,Click inside with magic wand again
Flood fill with paper2,Selections,Select none
Highlight rectangle1,Click on it with your magic wand tool
Flood fill with paper2,Make sure you cover all the pink
Selections,Select none
Click on rectangle2 with your magic wand tool
Go to Adjust,Hue and Saturation,Colorize with these settings
Hue: 55
Saturation: 102
Hit ok. Do this 2x's. Selections,Select none
Highlight the Stars layer,Use same settings as above to colorize them
Hide Glittercircleframe2,Click on the pink part with your magic wand
Flood fill with Saturation: 102 and Hue: 55
Do the same thing for the other small circle
Click on the Oval layer,Click on the small pink line around the oval with your magic wand tool
Colorize this part using the settings above
Selections,Select none
Copy and paste your tube of choice,Place till your happy
Click on the white part of the circle to highlight that layer
Click on it again using your magic wand
Selections,Invert
Highlight your tube layer and hit delete on your keyboard
Selections,Select none
Add dropshadow to your tube layer
Copy and paste StarBling,Resize 50%,Add dropshadow and place like mine
Duplicate,Image,Mirror,Image,Flip
Copy and paste FlowerGlass,Resize 15%
Add dropshadow and place on the corner of the rectangle
Duplicate,Image,Mirror,Image,Flip
Copy and paste Flower,Resize 10%,Add dropshadow
Place on top of FlowerGlass,Duplicate,Image,Mirror,Image,Flip.
Move into place
Copy and paste Cable,Resize 50%,Place like mine on the right
Add dropshadow,Duplicate,Image,Mirror,Image,Flip
Copy and paste Wordart4,Resize 25%
Take your deform tool,Rotate the wordart,Place like mine and add a light dropshadow
Copy and paste Staple,Resize 30%,Place on top right like mine
Duplicate,Move to the bottom of the tag
Copy and paste Wordart3,Resize 10%,Place in small circle,Add dropshadow
Duplicate,Move to top left circle
Now in the Thin rectangle,Write out a saying.
Add Your Name and CopyRight Info now!!
All done.
Sk8tr Babe
 All of my tutorials require a working knowledge of PSP! This tutorial was written by me on December 4,2009. It is of my own ideas and creation! Any other tutorials found to be similar is coincidental.
Supplies Needed
Scrapkit of Choice
I'm using a Wonderful kit called Garv's Board Sk8tr,made by Missy aka ScrapsWithAttitude This is a PTU kit i cannot supply. You can purchase her kit here
Tube of Choice
I'm using the Wonderful work of Keith Garvey. You must have a license to use his work! You can purchase that here
Template You can find HERE
Let's Begin
Open new image 600x600,Flood fill white
First thing we are going to do is open the template in psp
Click on the bottom layer on the template (Circle)
Open paper16 in your psp
Take your magic wand and click on the circle layer on the template
Change your foreground color to paper16
Flood fill the circle layer on your template
Selections,Select none
Now do the same thing as above only on a different layer on the template and with a different paper
Now Click on the white outside ring of each cirlce or square,Flood fill with a color of choice
(See mine for reference)
Copy and paste tube of choice,Resize 75%,Add dropshadow
Now choose your font,Change the size of the font to your choice
Write your name out in the bottom rectangle,(See mine for reference)
Add a light dropshadow
On your canvas you've been working on,Copymerge
Paste onto the white 600x600 canvas you first made at the beginning
Copy and paste sunglasses2,Resize 15%,Place next to your name,Add dropshadow
Copy and paste round frame2,Resize 10%,Place on the right corner of the rectangle where your name is
Copy and paste paper2 below all layers,Apply mask of choice and merge group on mask layer
Copy and paste sunglasses1,Resize 10%,Place on the other side of your name,Add dropshadow
Copy and paste butterfly 3,Resize 15%,Place like mine and add a dropshadow
Copy and paste butterfly 1,Resize 15%,Place like mine or of your choice,Add dropshadow
Copy and paste bow6,Resize 15%,Place like mine,Take your deform tool and tilt the bow a bit
Adjust,Sharpness,Sharpen
Add dropshadow of choice
Duplicate,Image,Mirror
(See mine for reference)
Type out the name of the tag Sk8tr Babe in a font of choice,Add dropshadow
Click on the thin lines that go around the circle and squares
Go to Adjust,Add/Remove Noise,Add Noise with these settings
Uniform checked
Noise: 70 %
Monochrome Checked
Hit ok
Now add any extra elements of choice
Add your Name and CopyRight Info now!
All done,Hope i didn't confuse ya too much lol
Newest Blinkies 12/4/09


These 2 blinkies was made for Alisha over @ Un-Leash-ed-Scraps.

This blinkie was made for LavenderAngel. to go with a custom blog.
Give Thanks

All of my tutorials require a working knowledge of PSP! This tutorial was written by me on December 2,2009. It is of my own ideas and creation! Any other tutorials found to be similar is coincidental.
Supplies Needed
Scrapkit of Choice
I'm using a Wonderful kit called Traditional Thanksgiving,made by Gothic Inspirations. This is a PTU kit i cannot supply. You can purchase her kit here
Tube of Choice
I'm using the Wonderful work of Elias Chatzoudis. You must have a license to use his work! You can purchase that here
Let's Begin
Open new image 600x600,Flood fill white
Copy and paste TagbackCluster,Resize 60%,Add dropshadow
Copy and paste tube of choice,Resize 80%,Place on left side of cluster,Add dropshadow
Copy and paste Turkey1,Resize 30%,Add light dropshadow and place in front of your tube
Copy and paste Fallingleaves,Resize 30%,Place behind the turkey
Copy and paste Beads,Resize 50%,Place on the bottom of the cluster but behind your tube
Add dropshadow of choice
Copy and paste pumpkinpie,Resize 30%,See mine for placement
Add dropshadow of choice
Copy and paste CornucopiaFilled,Resize 30%,Image,Mirror
Place next to the pie,Add dropshadow
Copy and paste BasketofApples,Resize 30%,Place behind your tube,(See mine for reference)
Add a dropshadow
Copy and paste ClipWFlower,Resize 30%,Place at the top of your cluster frame
Add dropshadow
Open the Leaves in your pspImage,Flip
Copy and paste onto canvas,Resize 30%
Place under the ClipWFlower,Add dropshadow
Copy and paste JeweledFlower,Resize 20%
Place on the end of the beads,Add dropshadow
Duplicate,Image,Mirror move into place
Copy and paste Moth,Resize 20%,Place on top right corner of cluster
Duplicate,Image,Mirror
Image,Flip,See mine for placement
Copy and paste Bow2,Resize 60%,Add dropshadow
Image,Mirror,Place on right side of cluster under the moth
Copy and paste Doodle,Resize 60%,Place on the left bottom side of the cluster,Behind your cluster frame
Duplicate,Image,Mirror,Move into place,Add dropshadow to both
Copy and paste Paper4,Resize 60%,Apply mask of choice,Merge Group
Copy and paste Acorn&Leaf,Resize 40%,See mine for placement
Change the Opacity to 60%
Add Your Name and CopyRight Info now!
All done :)
Love My Hooters

All of my tutorials require a working knowledge of PSP! This tutorial was written by me on December 1,2009. It is of my own ideas and creation! Any other tutorials found to be similar is coincidental.
Supplies Needed
Scrapkit of Choice
I'm using a Wonderful kit called Give a Hoot 4 Hooters,made by TaggingAngelsNScraps. This is a PTU kit i cannot supply. You can purchase her kit here
Tube of Choice
I'm using the Wonderful work of Elias Chatzoudis. You must have a license to use his work! You can purchase that here
Let's Begin
Open new image 600x600,Flood fill white
Copy and paste TripleFrame1,Resize 50 or 60%
Copy and paste papertc40,Resize 60%
Take your magic wand tool,Click inside each box on the frame
Selections,Modify,Expand by 3,Selections,Invert
Highlight your paper layer and hit delete on your keyboard
Selections,Select none
Copy and paste ribbon2,Resize 25%,Place in the middle of the frame,Add dropshadow
Now pick a font of choice,and type in each box Breat Cancer Awareness,Add dropshadow to each word
Copy and paste tree2,Resize 50% or smaller if you want,Place behind frame like mine
Add dropshadow of choice
Copy and paste accent1,Resize 30%,Place on the bottom of the frame
Duplicate,Image,Flip. Move down onto frame
Copy and paste tube of choice,See mine for placement,Add dropshadow
Copy and paste bandaid2,Resize 35%,Take your deform tool and rotate it,Place on the bottom corner of frame
Add dropshadow,Move this under the accent1
Duplicate,Image,Mirror
Copy and paste bling2,Resize 50%,Place below all layers
Copy and paste beadstring 1 and 2,Resize 10%,Place like mine,Add dropshadow
Copy and paste Frame2,Resize 50%
Copy and paste paper18,Resize 60%,Place below frame layer
Highlight your frame layer,Take your magic wand and click inside the frame
Selections,Modify,Expand by 20
Selections,Invert
Highlight the paper layer,Hit delete on your keyboard
Selections,Select none
Merge the 2 layers together
Move this layer below all layers,Add dropshadow,See mine for placement
Copy and paste paper16,Resize 60%
Move below all layers,Apply mask of choice,Merge group on mask layer
Add Your Name and CopyRight Info now!!
All done,Hope you enjoyed my tutorial:)
Dead Santa
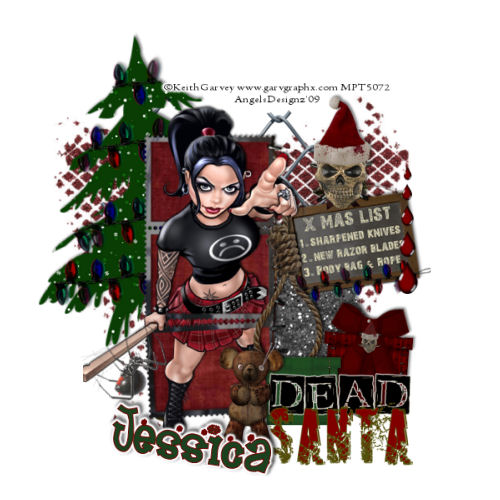
All of my tutorials require a working knowledge of PSP! This tutorial was written by me on December 1,2009. It is of my own ideas and creation! Any other tutorials found to be similar is coincidental.
Supplies Needed
Scrapkit of Choice
I'm using a Wonderful kit called The Darker Side of Christmas,made by Gothic Inspirations. This is a PTU kit i cannot supply. You can purchase her kit here
Tube of Choice
I'm using the Wonderful work of Keith Garvey. You must have a license to use his work! You can purchase that here
Let's Begin
Open new image 600x600,Flood fill white
Copy and paste Frame3,Resize 60%
Copy and paste tube of choice,Move below the frame
Duplicate tube layer,Move this layer above the frame
Take your Eraser tool and remove the part of the tube in the middle and at the bottom
Add dropshadow to the top and bottom tube layer
Copy and paste paper2,Resize 60%,Move below all layers but above white background
Highlight Frame 3 layer,Take your magic wand tool,Click inside each box on frame
Selections,Modify,Expand by 3,Selections,Invert
Highlight paper2 layer,Hit delete on your keyboard,Selections,Select none
Add dropshadow of choice to your frame layer
Hide white background layer by clicking on the eye
Merge all other layers visible,Rename this layer Tube
Unhide white background layer
Resize Tube layer 80%
Copy and paste Links,Resize 60%,Place behind tube layer,Add a light dropshadow
Copy and paste Tree,Resize 60%,Place behind tube layer but above links layer,Add dropshadow
Copy and paste GlitterTree,Resize 60%,Take your Deform Tool and tilt a bit to the right
Place behind the tube layer,Add dropshadow
Copy and paste ChalkBoardWList,Resize 30%,See mine for placement,Add dropshadow
Copy and paste noose,Resize 40%,Place on the chalkboard,Use your eraser tool at the top
(See mine for reference),Add dropshadow of choice
Copy and paste Lights,Resize 40%,Place on the bottom of the chalkboard
Use your deform tool to tilt the light some
Copy and paste BackDrop,Resize 70%,Place below all layers
Use your defrom tool to squeeze it in a bit
Copy and paste present1,Resize 30%,See mine for placement,Use your deform tool and tilt it to the right
Add dropshadow of choice
Copy and paste present2,Resize 25%,Add dropshadow and place by present1
Copy and paste Wordart2,Resize 40%,Place below presents
Copy and paste DeadbearPressie,Resize 30%,Place next to wordart,add dropshadow
Copy and paste Skullinhat,Resize 30%,Place on top of chalkboard,Add dropshadow
Add Your Name and CopyRight Info now!!
That's it,Thanks for trying my tutorial:)
Subscribe to:
Posts (Atom)


